

ORC Week 4: DIY Modern Farmhouse Wood Shutters
…and One Room Challenge Week FOUR progress (I can’t believe it’s already week four!).
First, our spontaneous shutter project… Here’s the why:
People who have known me since I was little know that I’ve always enjoyed flexing my creative muscles. Whether that was creative writing and sketching glamorous gowns in my younger years or working as a professional copywriter, English teacher, and interior decorator through my 20s and into my 30s, I find the most joy in being creative. I used to be a family and engagement photographer on the side when I worked in PR because it was a fun way for me to earn some extra income.
The thing with being a photographer is that it teaches you to see the whole scene, not just the subject being photographed. What good is a set of engagement photos in the city when in the background, you can see a garbage can out on the curb? How much would you love your rustic mountain-setting family photos if there are power lines running over the scene or cars whizzing by in the distance? Now that I’m an interior decorator who is always photographing my projects and DIYs, when I look at a setting, I look at the whole setting. I know that my photos when I finish this One Room Challenge will not only reflect the patio paint, the turf, and our upcoming built-in grill area; they’ll need to articulate a sense of completion and comfort in this new space we’re creating.
We’ve already painted our home’s exterior to help the project reveal photos have more oomph. After doing that, though, it occurred to me that our patio-facing windows are two different sizes.
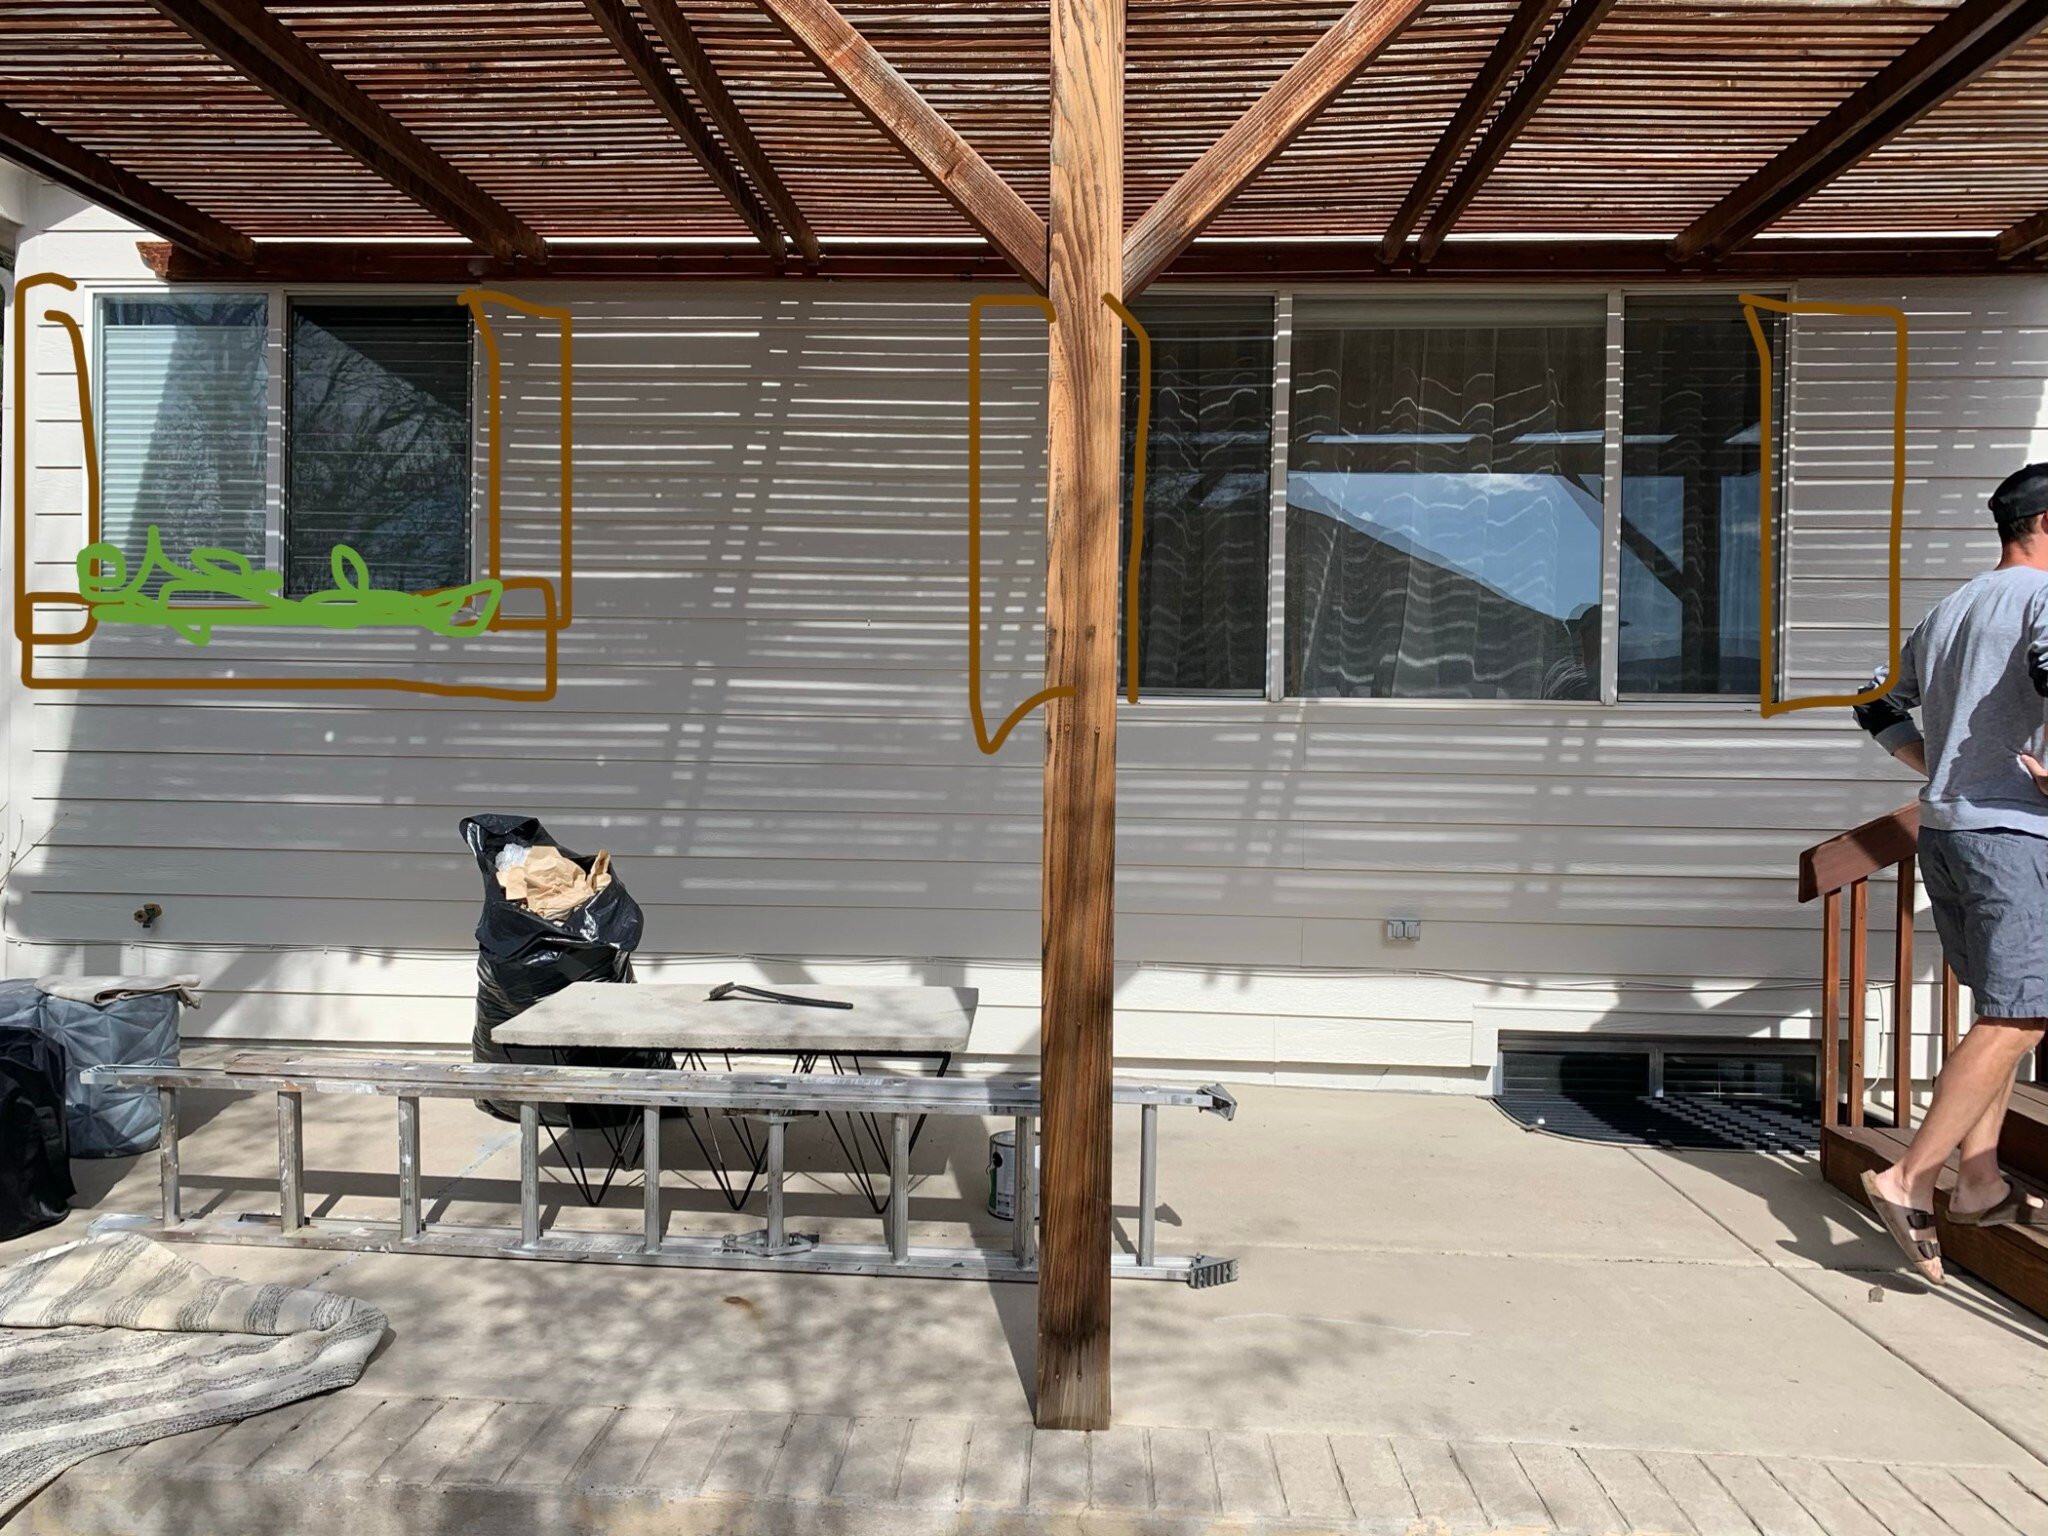
Since I want my “after” photos to WOW people (you!), I’ve decided to play a visual trick on the camera. I’m thinking that by adding shutters and a planter box to the shorter window, and then adding matching (taller) shutters to the taller window, it’ll give the effect of matching window sizes. Wish us luck, and let’s hope this works how I’m picturing it! Here’s how we’re building our new shutters:
Materials for two 60″ L x 12″ W shutters:
Mitre saw
x4 1″x3″x12′ cedar boards (or whatever wood you prefer, but we love using cedar because of its softness and ability to absorb stain color)
x4 1″x2″x8′ cedar boards
20′ of 1″x1″ wood moulding
x1 square layout tool (basically, an angle)
Wood glue
Nail gun (and nails, obvi. Jason says they’re 1 5/8″ brad nails)
Wood clamps
Sand paper, 150 grit
Minwax stain (or paint if you’d prefer painting yours) in Early American (In my opinion, this is the most versatile wood stain color Minwax makes. You might elect to use a different color stain depending on the colors of your home’s exterior or other wood tones nearby.)
Minwax satin poly wood sealer

Steps:
1. Cut the 1″x3″ wood boards to 58.5″ L (there will be eight of these)

2. Glue and clamp four of these together, side-by side. These will be the background of your shutters.
3. Cut the 1″x2″ wood boards at 45º angles, with the short ends being 58.5″ L. These will become the frames to your shutters.

4. Glue and nail the “frames” around the perimeter of your four vertical boards (the background from step 2), and make sure the 1″ side is facing up/down, while the 2″ side is facing in/out so that these boards stand proud of the backing. To help hold the frames in place while nailing them to the background boards, use clamps.


5. Cut the 1″x1″ pieces at 45º angles, at 10″ long. These will become the pattern you see in the middle. Place them inside the frame and make sure everything is well-spaced-0ut visually before gluing them on to the back-boards.


6. Give everything a light sand, then stain. ALWAYS test your stain colors on scrap wood prior to staining your freshly made masterpiece.
7. Cover stain with wood sealer.
I don’t have a photo yet of the finished product, as we ran out of material when working on the second set of shutters (we forgot those needed to be taller).
Everything else we’ve been working on since my last One Room Challenge post…
We’re almost finished painting the concrete! Once I finish this, I’ll share all of the specifics, including some of the pain points of this project and what I’d do differently next time. So far, two things I’m really happy with are the stencil I bought from Royal Design Studio Stencils (ours is the Ranae Geometric Floral Stencil) and the type of paint I’m using, which is the Clark & Kensington Exterior Satin paint from #MyLocalAcestore, @westwoodsace. We are super blessed to have the opportunity to represent Ace Hardware with this project, and there’s no way we could have done all of this without their generous support.
We’ve also cut and installed some artificial grass (turf) over our lower patio. We used pet turf so that it would drain properly since we were installing it over concrete. You guys, it was a lottt of concrete, and our poor baby Joe tripped on his feet and cut up his hands, knees, and even his face one too many times on it. It’s also the only portion of our “yard” that we can see from the pergola area, so we wanted to make it not only nicer on the eye, but also more child-friendly for Joe to enjoy. He’s absolutely loving it so far! Here’s a pic of him on his new splash pad we bought for the super hot summer days that are yet to come…

Jason is very excited about this next project that he’s almost finished with: the wood and stone benches! He came back from the hardware store pumped-up and ready to begin assembling these benches, which we originally saw on Pinterest, but we’re giving ours a modern edge and leaving the tops of the 4″x4″ pine posts exposed. They’ll be flush with the top of the stone pavers, and the way we’re keeping these stable is by using lots and lots of this awesome Loctite PL 500 Landscape Block Synthetic Rubber Construction Adhesive 28 oz. from Ace.


Still to come…
We are going to attempt our first-ever waterfall concrete countertop!! We’ll need all the luck and don’t-mess-up vibes you’re able to send our way! I’ve outlined the plan visually in my ORC Week 1 post, but in case you’d like a brief rundown here, the plan is to build a structure around the new Weber Genesis II E-335 Liquid Propane Grill Ace is so generously gifting us so we can (soon!) bring you this DIY tutorial. We’re planning to build a frame around the whole “outdoor kitchen” area, and then since we have a window well coming up from the basement right there (we clearly cannot cover that), we’re planning to extend the concrete countertop over that and then down the far side. This will give us extra work space without obstructing our fire exit from the basement, God forbid we ever need it.
As for our other DIYs, I’m about to give up on IKEA. It’s not their fault, but due to COVID-19 and restrictions on how many pick-up orders each store can receive per day, I haven’t been able to order three of these Torared seagrass pendant shades I wanted to use for a DIY light cluster. Whenever I place the order for pick-up at the only IKEA store in Colorado, the site tells me, “We have received our maximum order capacity for the day, for this location. Please try again tomorrow.” Bleh. Their customer service line is at capacity every time I call, so it won’t even let me sit on hold. Double-bleh. Delivery to our home says it would cost $47, and for a total order of $59, an additional $47 doesn’t sit well with me. I’m heading back to the drawing board to try to dream-up some other cost-saving solutions.
Another to-do is to line our artificial grass with some stone. To keep the palette consistent, we’re going to use the same stone as what we’re using in the benches. We’re still playing around with how we can secure the stone around the perimeter of this new play area without preventing proper water drainage. The thing is, though, we need a perimeter because there’s a two-to-three-foot drop-off at the end of the patio (our home is built into a hill), so we need something to help keep Joe from running off the edge.
I also need to pick out an outdoor rug to ground the living space (the sitting area), and I need to decorate it in general. I recently got some new outdoor throw pillows from Pottery Barn that I think will look incredible in this area! I’m also excited to use my new modern planters from Burke Decor in this space!
Until next week!