

An Entryway Remodel for *this* Century
Our current home was built in 1999, which was SO last century ;)
How Did We Land Here?
When our fabulous realtor Kendra first took us to look at this house back in January 2019, I took one step in and fell in love. I knew from the listing that the home had 10’ high ceilings, a gas fireplace, and loads of potential! Now, when I say the home had potential, I mean it had a pretty open floor plan already, loads of natural light, the square footage we were looking for, and it had windows facing in every direction (something our first house lacked). What it didn’t have, though, were any of the stylish finishes today’s homeowners (read: my husband Jason and I) liked and wanted to have in a long-term dwelling place.
Upon walking two steps into the entryway of this home, I took in the square patterned vinyl-sheet flooring leading to dingy beige carpet that flooded the entire main floor (with exception to the kitchen, formal dining, and bathrooms). There was a recessed semi-arched niche in the wall to my right and a 6.5’ door leading to a traditional coat closet. There also hung a very dated chandelier to match the very dated front door and sidelite.

Screenshot from Zillow listing
This house sat on the market for six months in a neighborhood where normally, homes are snatched up before they even appear on Zillow. Jason and I speculate that this might have been because it was overpriced for all of the work it needed. Yes, we put in a low-ball offer. They still made us come up, but in the end, we didn’t pay the full asking price for this house, and that’s NUTS, especially in this Denver-area market. Truth is, nothing in this home appeared to have been updated since the early 2000s, not to mention there were electrical problems and mold issues in some of the windows. Looking at allllll that old, matted and worn-down beige carpet might make the average home buyer turn right around and leave. After all, laying 1800 square feet of hardwood flooring is expensive, and labor-wise, it’s a big undertaking!
Jason and I had been in a similar position before, though. Our first house was a new-construction tract home that lacked the slightest hint of character, and we couldn’t afford many of the builder’s upgrade options. We worked on that house one room at a time for two years until it was exactly what we wanted, and then we had a baby, realized we didn’t have any storage or room to grow into that house, and listed it for a pretty nice profit. All of that research, hard work, and budget-savvy updating provided us the opportunity to buy this 1999 fixer-upper in the neighborhood we used to drive past and say to each other, “Maybe someday…”
Tackling the Entryway
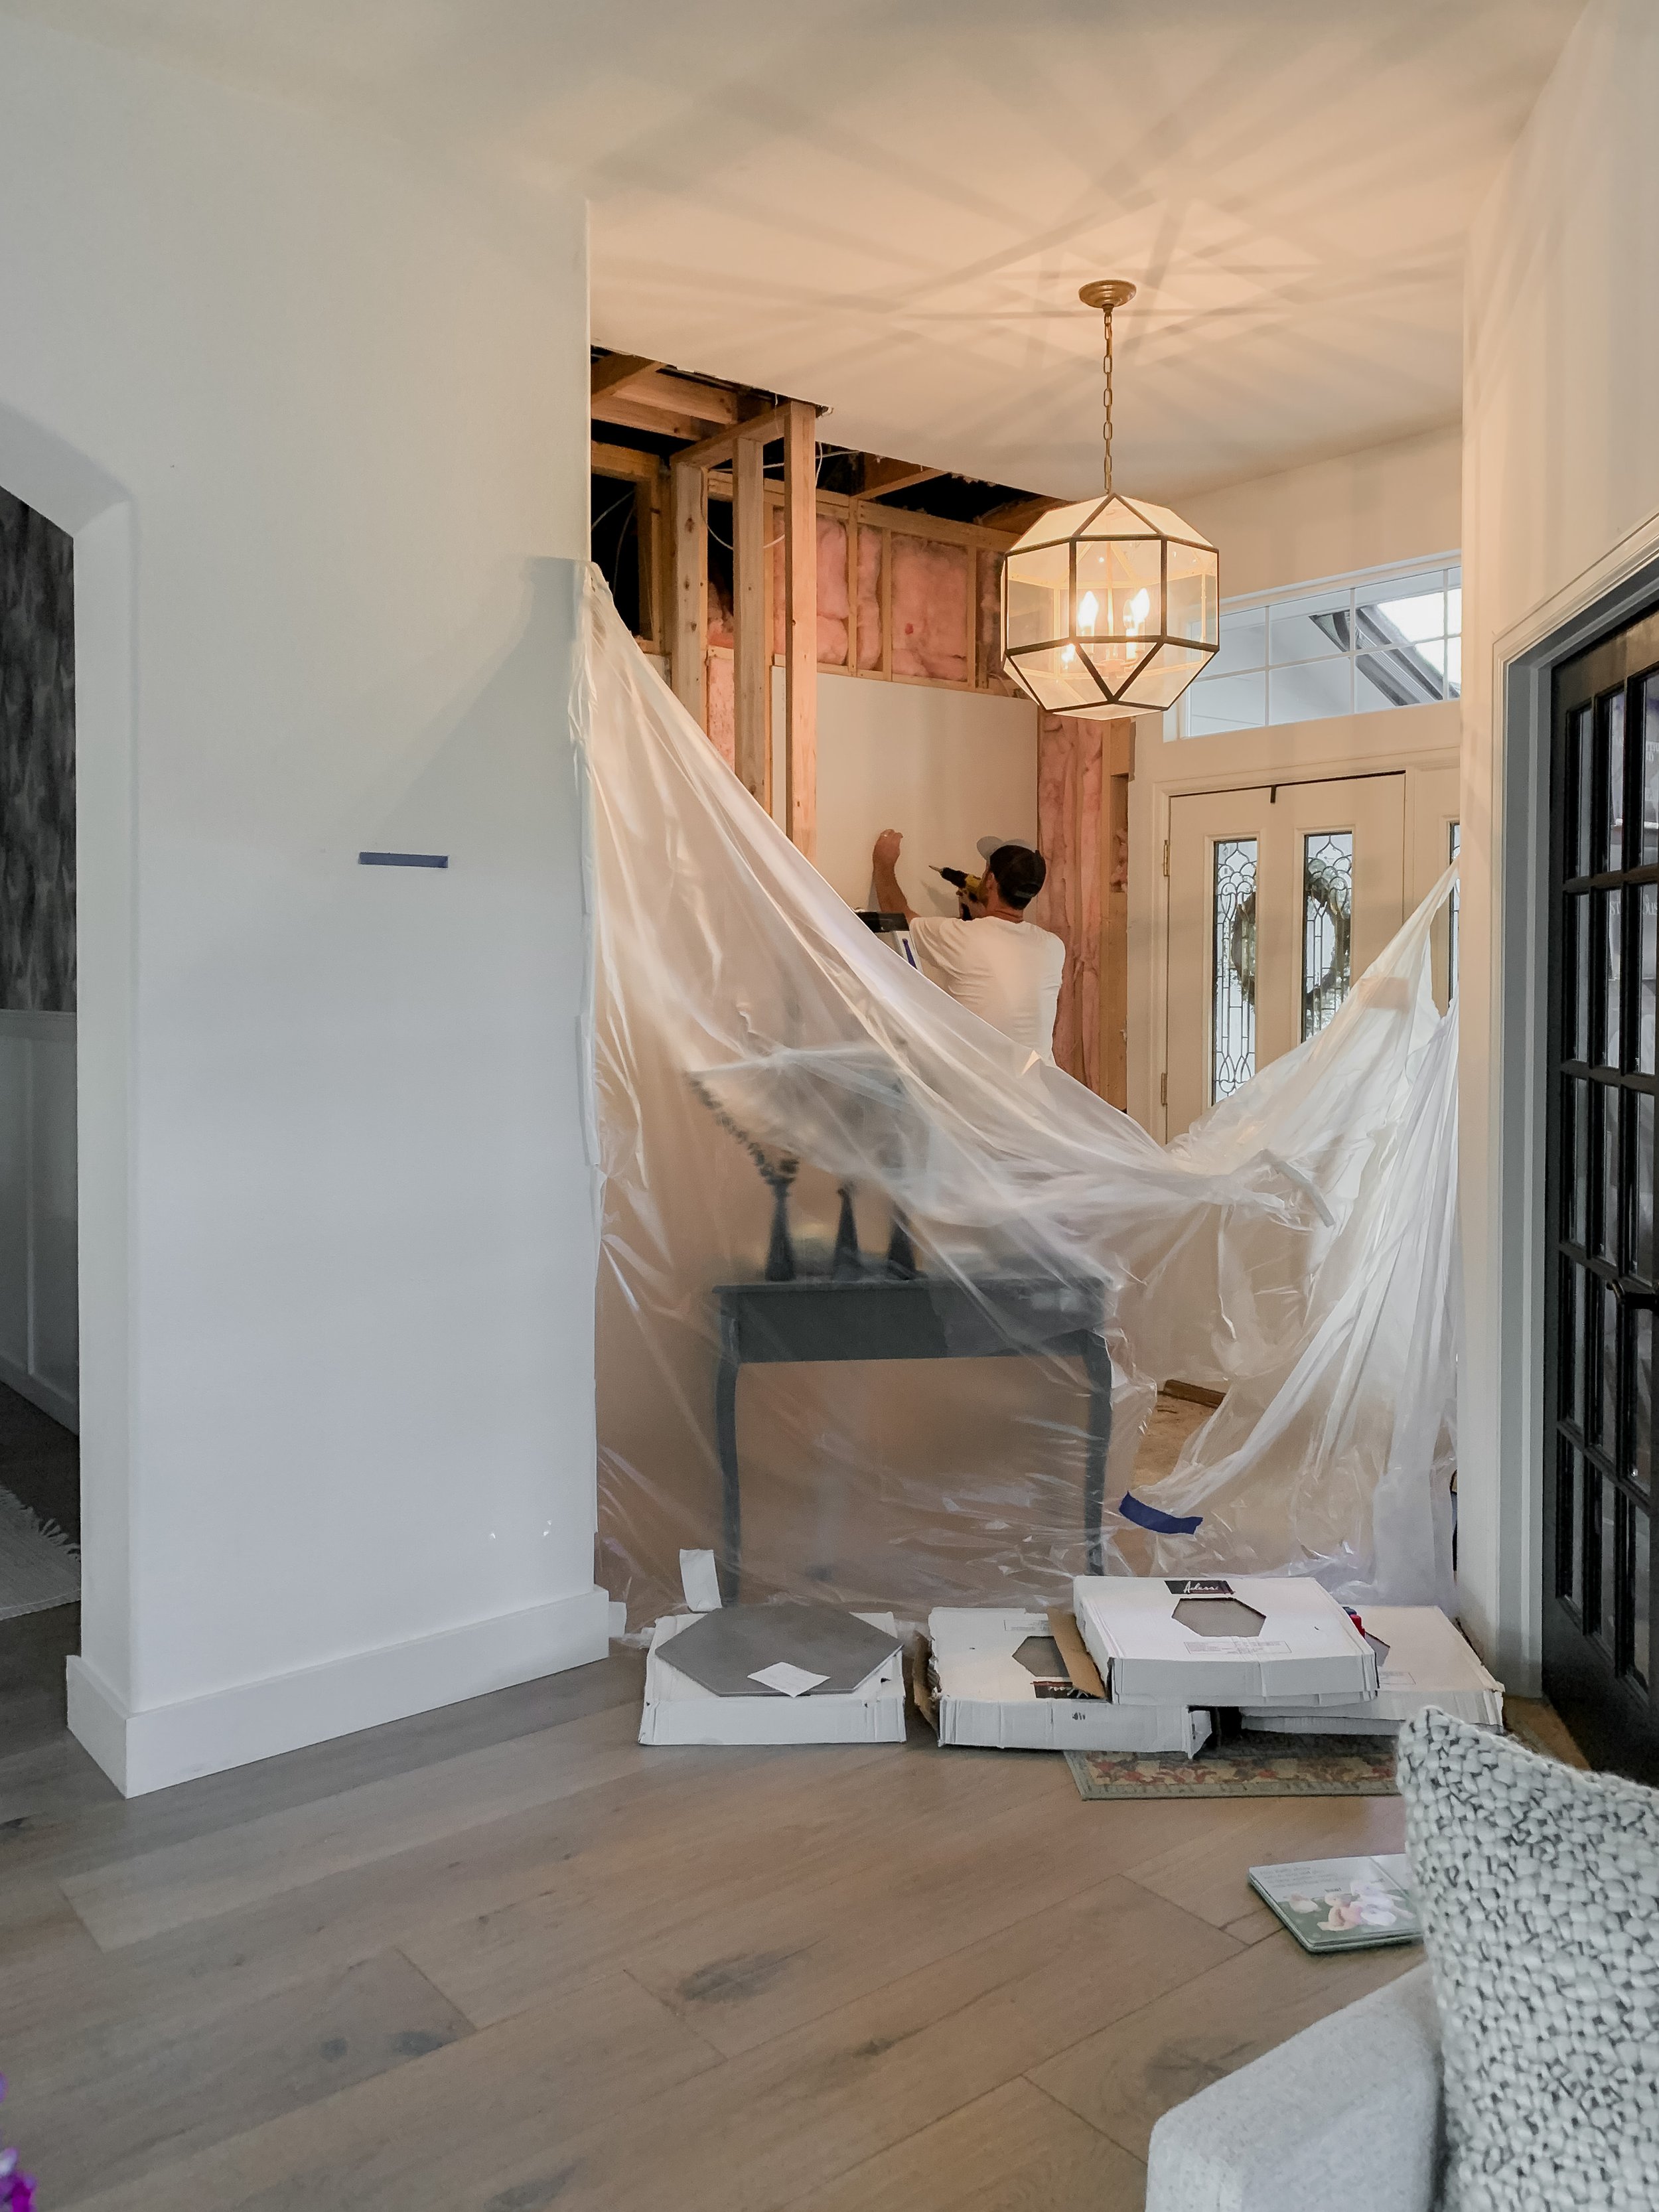
While we first needed to address a handful of other spaces and safety to-dos, I used to hang out in the sitting room and stare at the entryway, imagining what we could do with it. The layout was a little bit wonky, as the walls sort-of shifted to the left upon entering the home. I like squared-off, straight angles, so this was a design challenge for me. While I pondered that conundrum, I knew the easy changes (Jason might scoff when he reads this… “Easy??!”), would be replacing the floor materials, updating the light fixture, opening up the recessed niche in the wall, and bringing all of the doors into the current decade.
The Wall Niche + Built-ins
We decided that if we were going to open up the niche to make space to slide a tastefully modern console table into it, then we might as well go all-out and replace the traditional coat closet with some taller, more statement-making built-in cabinets. This also meant that we’d need to remove the clunky walls that separated the formal dining room from the rest of the great room. We had a dumpster in our driveway for that weekend only, so we took advantage of having somewhere to drop all that material and debris, and we went for it!


If you didn’t already know this about us, Jason and I are frugal people. We want our home to have a high-end look, but we don’t want to pay top dollar on materials and labor to get it there. So what do we do? Lots of DIYs and IKEA hacks :)
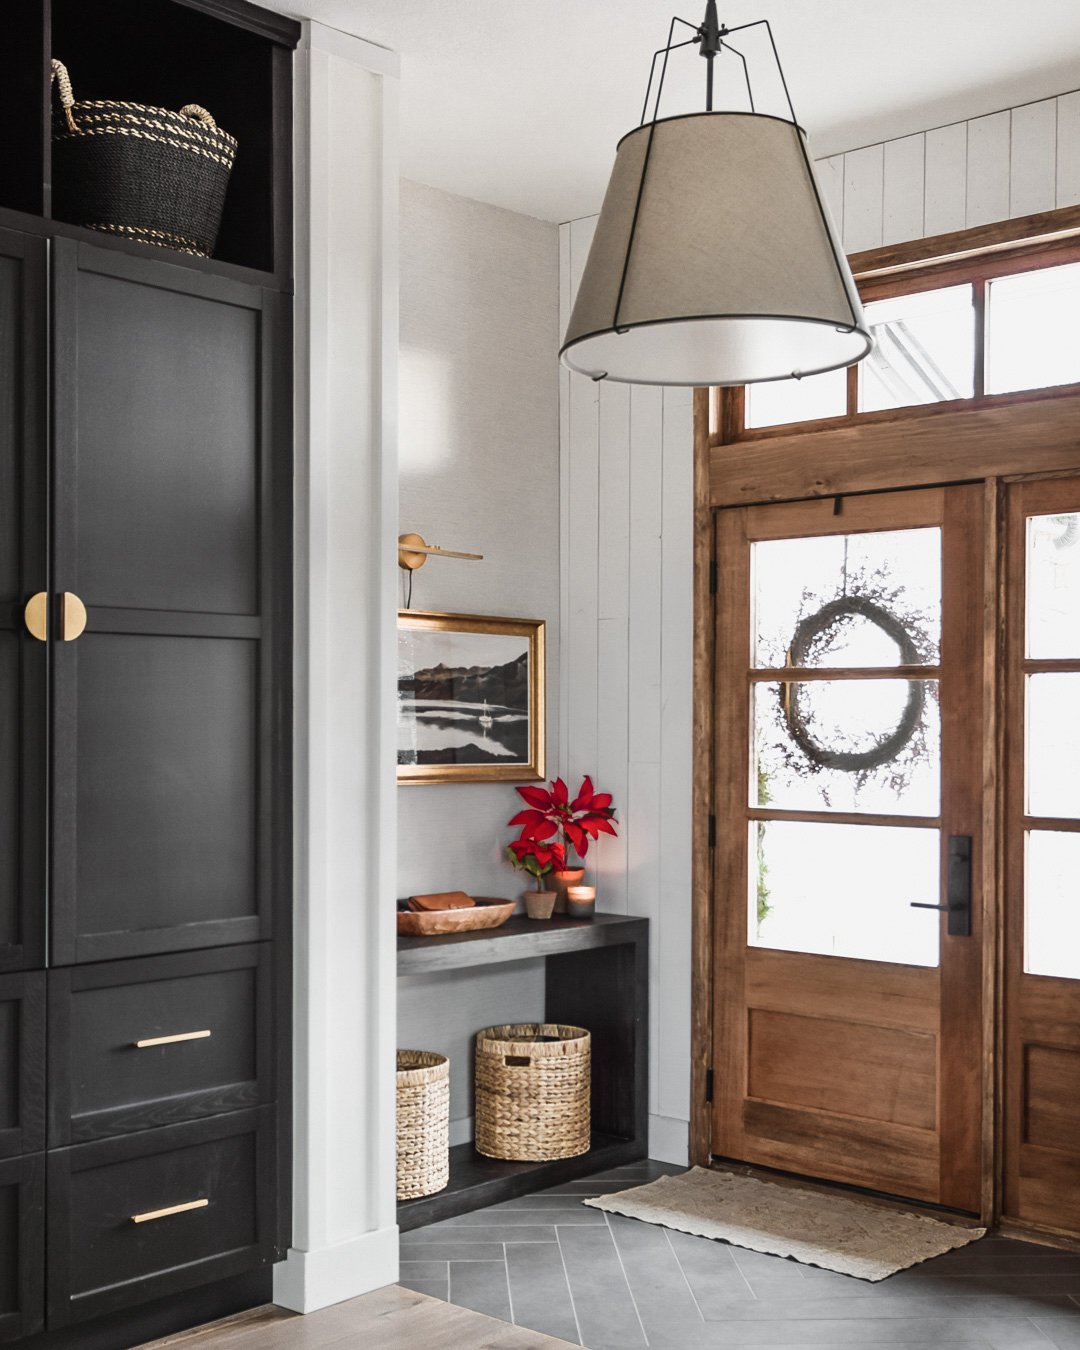
The black built-in cabinets are actually just two Sektion High kitchen cabinet boxes with four drawers from IKEA. It has two drawers hidden behind the cabinet doors and then two exposed drawers below them. If you go into the store, you can buy customize the exact layout of your Section cabinet boxes using Maximera parts for the insides, and you can also choose to order these without the doors in case you wanted to use other IKEA or Semihandmade doors made for the Secktion units.

The doors are black wood-look IKEA Lerhyttan cover panels, toe kick, and crown moulding, and the hardware came from an Etsy shop that, for some reason, no longer exists. We also installed a wood dowel and some hooks in the uppermost areas so we could hang coats and jackets, and then Jason built those cubbies above to add height to the cabinets and bring them up to the ceiling. We color-matched the paint at our local Sherwin Williams store, but it’s basically “Caviar” (one of their blackest blacks).
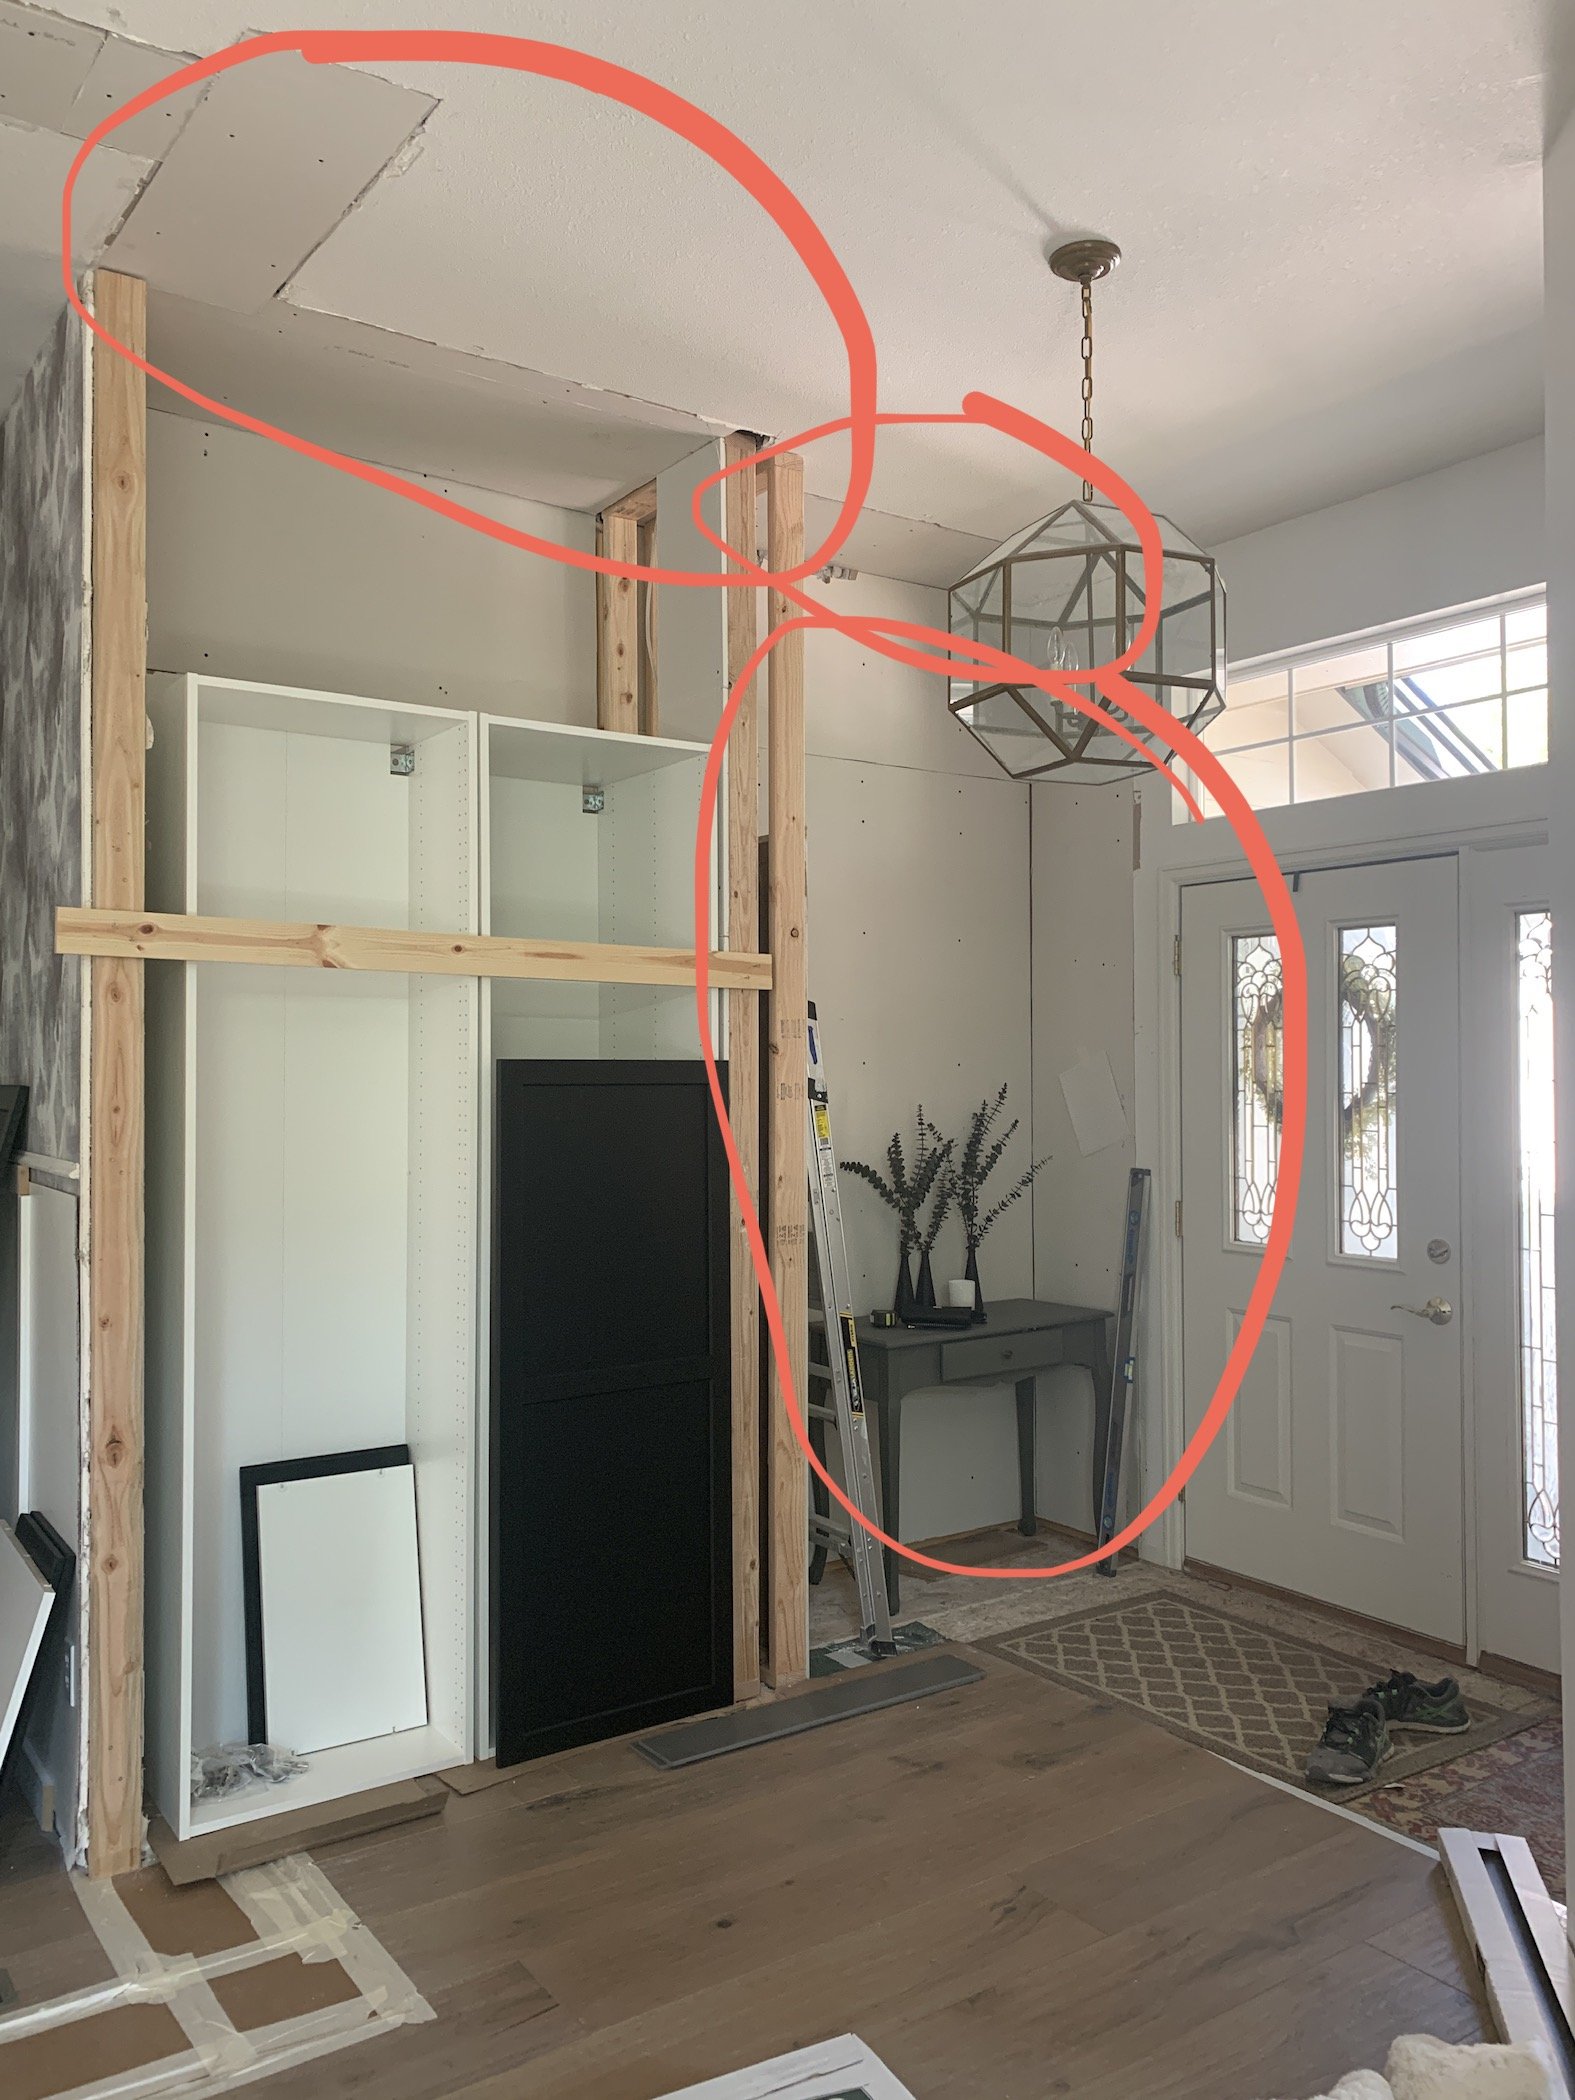
As you can see in the images above, we had a lot of patching to do, both in the drywall and in the floor!
Furniture and Decor
I spotted this Folsom console table at Pottery Barn, and I LOVED its sleek shape, wood texture, and charcoal finish to coordinate with our built-in cabinet doors. To decorate it, I added a wooden dough bowl (a great stylish drop bowl for keys, sunglasses, facemasks, etc.), a medium-sized plant, and some candle holders (hurricanes, taper candles, whatever makes you happy). This arrangement is super easy to maintain and change-out with the seasons if you like to switch it up!
For stylish storage of unsightly, but commonly used things such as shoes and umbrellas, I added some cute baskets. I also got some baskets to store off-season goods, and I keep those way up high in the top of the built-ins’ cubbies.
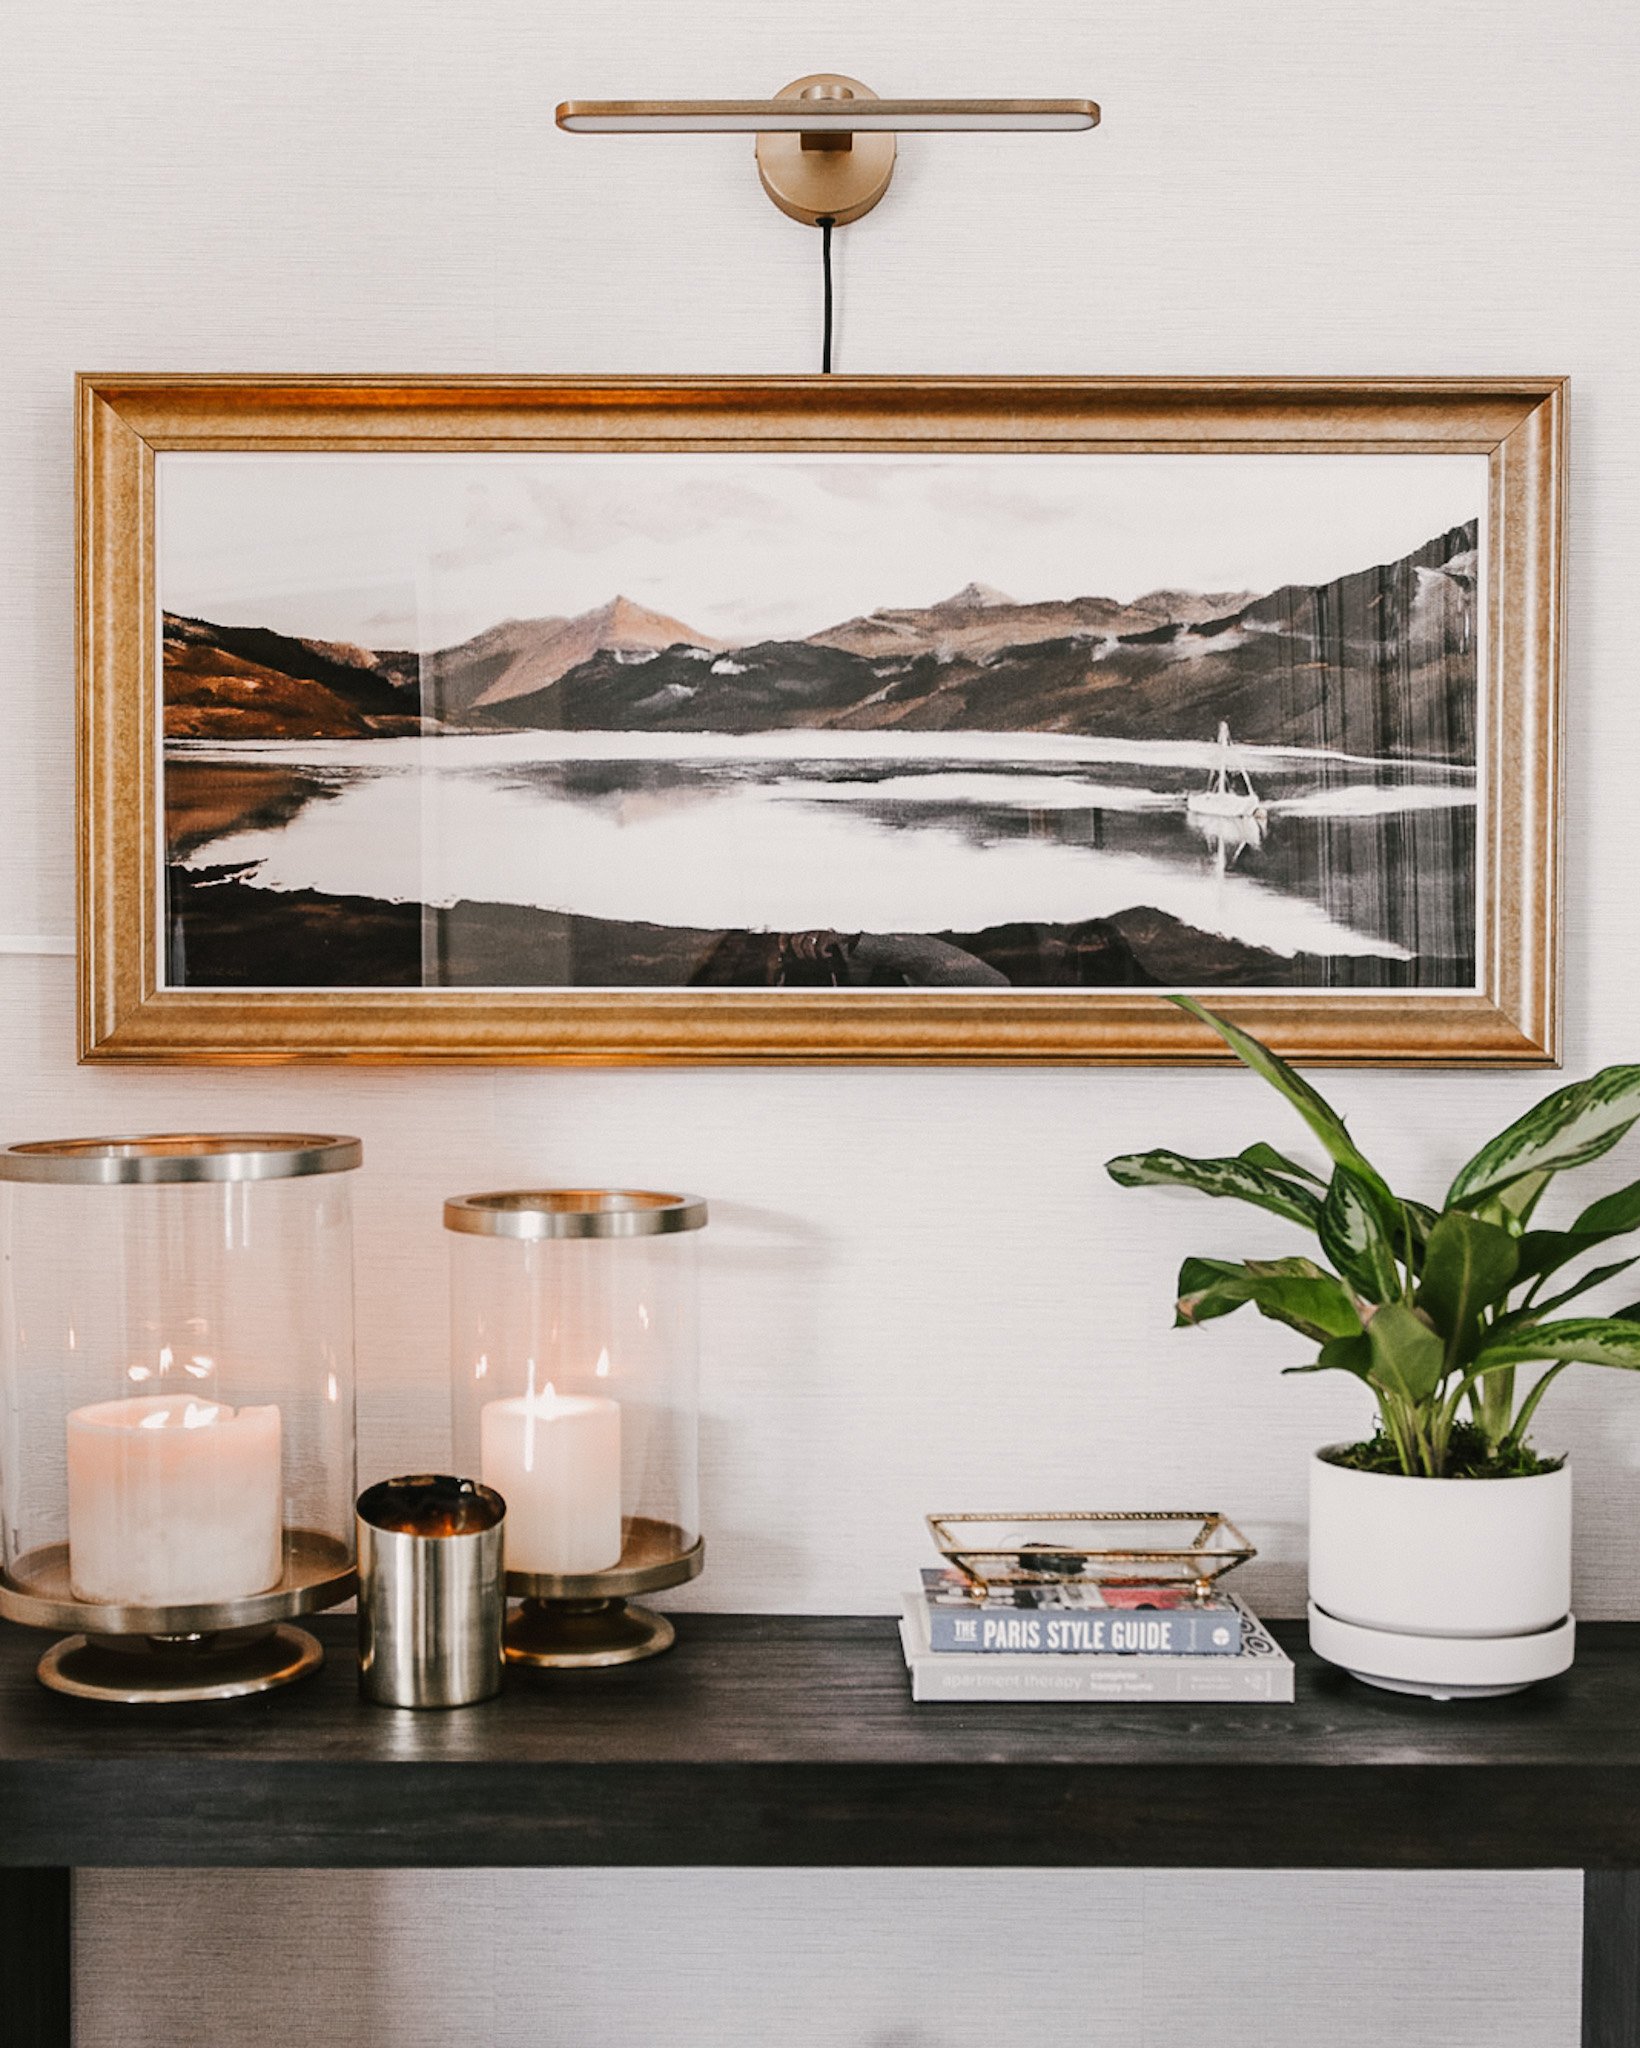
Our art was generously gifted by Coleman Senecal, a talented American artist who—at the time—was living abroad and painting gorgeous scenes from her travels across Europe. This painting of a lake among mountaintops called “New Mercies” reminded me a lot of my favorite lake to visit here in Colorado: Lake Dillon in Frisco. To enhance its warm tones and bring a tonal balance to our entryway (there was a lot of black going on), I sourced a beautiful gold frame called “Chelsea” from Framebridge.

Walls
For texture on our newly drywalled walls, I chose a faux grasscloth from A-Street Prints. It’s their Agave off-white faux grasscloth wallpaper, and I love the hint of texture it adds. On the adjacent walls, we applied a salvaged white barnwood for a little bit more character, adding some clean lines and depth. I don’t have a link to the exact product we used, but StikWood’s Hamptons White is a pretty exact match, and that’s even easier to install because they have peel-and-stick backing, not requiring any nails!
Lighting
We swapped out the original light fixture almost immediately when we moved in. I chose a gold cage-style pendant, and while I can no longer find the exact link to the one we used (that was nearly three year ago now), I found a look-alike option around the same price. Once we updated everything else in this space, the caged pendant no longer seemed to fit with the style we were heading in, so I selected this 24” Conical Drum Pendant in Sand/Bronze from Rejuvenation. It has a more streamlined look, and with the warm white tone of the shade (versus crisp white), it’s yet another area way to add a sense of comfort through texture.


For the wall behind the console table, I felt it needed something above the art. It simply looked too tall and narrow, so I found this super-affordable (less than $50!) plug-in art light on Amazon. I dropped the cord down behind the artwork and used wire mold to direct it over to the side wall and then down to the outlet, hiding most of the cord.
Flooring
All of the flooring throughout the main level of our home (our house is a ranch, so it’s all one floor, but there’s also a basement) is French Oak Engineered Hardwood Wide Plank Flooring from Hurst Hardwoods. The color is called “Blue Ridge,” although it appears as though the stain/finish might have changed a little bit since we first installed it. When we ordered a box of the same flooring material a few months ago to patch some flooring where we removed walls, all of the boards were slightly cooler and more matte-looking than our existing floors. I’d recommend ordering samples no matter where you decide to source your floors, as colors never look the same online as they do in person.
The tile we used is no longer listed online (we found it at Floor and Decor), but this is a VERY similar option. Same dimensions, same finish, but this one is slightly darker in tone. Still gorgeous in my opinion!
FINALLY! The Front Door!
I had my heart set on installing a wood front door with clear glass to allow LOTS of light in, modern lines to update the look and feel of our entryway, and sleek door hardware that would replace the awful 1990s polished gold curvy piece that was there. We went back and forth for more than a full year on whether to do a like-for-like (same size) door, sidelite, and transom window OR to make this a bigger (and therefore more expensive) project by increasing the height of our door to eight or nine feet.
Why would we want to do this? Well, our home has 10’ ceilings throughout the interior, but all of the doors are standard-height (6.5’) doors. It leaves a ton of open space above each door, and it doesn’t look right, proportionally speaking. I wanted to install a really tall front door in place of the existing door and transom, but with the stonework on the exterior of our home, that would have been an EXPENSIVE swap. That, and the exterior awning over the door lands at 9’, not 10’ like the ceilings inside are, so it would have looked like our door came right up to the awning when looking at our home from the street.
We saved money and still got a “WOW” front door package by collaborating with Simpson Door Co and hiring our friend Casey and his team from Magpie Custom Carpentry to install it. We chose door style 7503 in unfinished fir, which we stained in Minwax “Early American” and sealed with a satin poly ourselves. The matching sidelite is 7803, and the transom we chose is 7753. Not only has this door package updated the look and feel of our entryway; it COMPLETELY transformed and brought into the current decade the look and feel of our entire home! We couldn’t be happier with it.


What Did I Miss?
We did this project in stages over the course of two years, so while I hope I remembered to include all of the important details, I might have missed something here or there. Any questions? Please don’t hesitate to leave them in the comments!